Wednesday, 14 October 2015

How-To: Add WiFi to the Raspberry Pi

Hello Friends, 
as you may know the Raspberry Pi can only access your home network using a network cable. But lets face it, your Raspberry Pi project is not always going to be deployed close to a network outlet – so what do we do?
The best solution is to buy a cheap USB WiFi adapter and use one of the USB ports to access our wireless home network. Setting up a Raspberry Pi using the Raspbian OS to access your wireless network is easy – this guide will guide you through the process.

Prerequisites & Equipment

You are going to need the following:
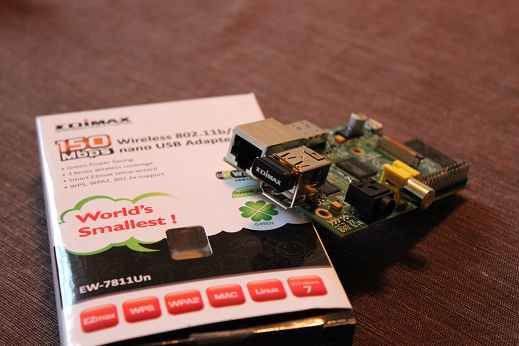
Before we proceed I want to point out the importance of buying the right USB WiFi Adapter. As you may have experienced with other types of hardware devices not all devices are plug-n-play. Sometimes you will need to download a driver to make them work. While drivers are normally readily available for Windows computers – it is a different world for Linux and Raspberry Pi’s. This is why it is very important to buy a WiFi Adapter that mentions “Linux” in the product description or package. I use the Edimax – Wireless 802.11b/g/n nano USB adapter because I have found it to be cheap and very easy to work with. I very recommend you do the same – it could save you a lot of headaches.

Adding WiFi adapter to the Raspberry Pi

Plug the USB WiFi adapter into one of the free USB ports on the Raspberry Pi. Power up the Raspberry Pi – remember at this point the WiFi adapter does not work yet. You are still going to need some other means of being able to control the Raspberry Pi either via a keyboard or remotely using a wired network connection.
After booting and logging-in you want to make sure that the Raspberry Pi found your new wireless adapter. To look at which peripherals the operating system found when booting run the following command:
dmesg | more
You can use the spacebar to scroll down a page at a time – towards the end you will see something similar to the following lines:
[ 3.282651] usb 1-1.2: new high-speed USB device number 4 using dwc_otg
[ 3.394810] usb 1-1.2: New USB device found, idVendor=7392, idProduct=7811
[ 3.407489] usb 1-1.2: New USB device strings: Mfr=1, Product=2, SerialNumber=3
[ 3.420530] usb 1-1.2: Product: 802.11n WLAN Adapter
This means that the operating system recognized the USB WiFi Adapter using one of the built-in drivers (you can return to the terminal by pressing “q”). All that is left is to configure your WiFi connection.

Configuring the WiFi network

On the Raspberry Pi (and on Linux in general) you configure your network settings in the file “/etc/network/interfaces”. You can edit this file using the following command:
sudo nano /etc/network/interfaces
This will open the file in an editor called nano it is a very simple text editor that is easy to approach and use; even for users not familiar to a linux based operating systems just use the arrow keys.
After opening the file in nano you will see a screen like this:
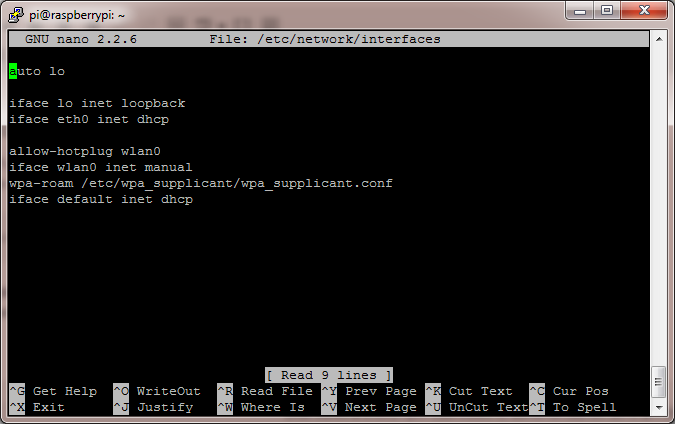
interfaces in nano - initialTo configure you wireless network you want to modify the file such that it looks like the following:
auto lo
iface lo inet loopback
iface eth0 inet dhcp

allow-hotplug wlan0
auto wlan0

iface wlan0 inet dhcp
   wpa-ssid "Your Network SSID"
   wpa-psk "Your Password"
You will need to put your own SSID and password into the appropriate places. If you can’t remember your network name – just pull up your phone it will most like display the name in the settings or network settings screens.
After editing the file you should see something like the following:
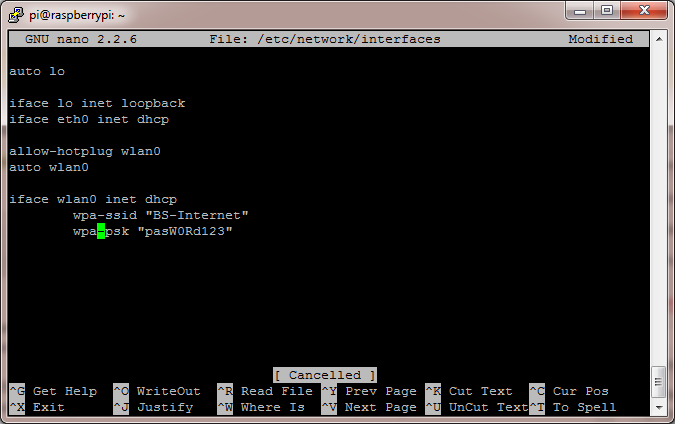
interfaces in nano - after edit
To save the file press Ctrl+O this will write the file to the disk – afterwards you can exit nano by pressing Ctrl+X. If nano asks if you want to Save modified buffer? press “Y” followed by hittingenter to confirm the filename.
At this point everything is configured – all we need to do is reload the network interfaces. This can be done by running the following command (warning: if you are connected using a remote connection it will disconnect now):
sudo service networking reload
After reloading the network interface (and re-connecting to the pi if you are using a remote connection) – you can now check the status of our WiFi connection by running:
ifconfig
The result should look something like this:
wlan0 Link encap:Ethernet HWaddr 80:1f:02:aa:12:58
      inet addr:192.168.1.8 Bcast:192.168.1.255 Mask:255.255.255.0
      UP BROADCAST RUNNING MULTICAST MTU:1500 Metric:1
      RX packets:154 errors:0 dropped:173 overruns:0 frame:0
      TX packets:65 errors:0 dropped:0 overruns:0 carrier:0
      collisions:0 txqueuelen:1000
      RX bytes:32399 (31.6 KiB) TX bytes:13036 (12.7 KiB)
If you see a valid IP address under “inet addr” you can now disconnect the network cable, and enjoy your freedom to move your Raspberry Pi around – because the WiFi connection is up and running!

Start Banana Pi a first time

Hello Friends, in this article I will present you with the experiences that I made when installing everything to boot up a Banana Pi with a Lubuntu operating system. I will also show you what went wrong and will sprinkle in some hints on how to configure the system.

How did I get this idea?

I was always wondering how to get my own server up an running at home. I did my first steps with a laptop but that was not satisfactory. I wanted to use the laptop also for other stuff and furthermore I disliked the ratio between power consumption and the time I actually used the server. So when hearing about the Raspberry Pi I was interested but only when reading about the Banana Pi I was hooked as I believed it would suit my requirements:
  • No fan, no noise
  • Small and unobstrusive
  • Constantly on as it consumes low power

Banana Pi Shopping cart

So I bought a few components.

COMPONENTS

  1. Banana Pi board
  2. SD Card SanDisk Ultra 30MB/s 8GB class 10
  3. Micro USB AC/DC Adapter, Model “MAREL-5V2000″

Installation

But the Banana Pi HW itself isn’t booting up on it’s own you need a decent Operating System and there exists a bunch of them. You will find all of them on the lemaker web pages. As I fancy Ubuntu my first choice was the Lubuntu distro. Besides you will find quite a few installation instructions which helped me a lot but there were also pitfalls.
I will show you how it worked in my case and as always I don’t take any responsibilities you use the following instructions at your own risk. ðŸ˜‰

PREPARING THE SD CARD

The below is pretty much the same as in the instructions. just the name of the SD card device is different. I used my laptop, which allows me to insert SD cards, with an installed Ubuntu 12.4.
When hiting return on the comamnd in line 6 be prepared to take a break. This took for me about 20 to 30 minutes to finish.
1
2
3
4
5
6
sudo fdisk -l
umount /dev/mmcblk0p1
sudo fdisk -l
tar zvxf Lubuntu_For_BananaPi_v3.1.1.tgz
ls *img
sudo dd bs=4M if=Lubuntu_1404_For_BananaPi_v3_1_1.img of=/dev/mmcblk0

First start, first experience

Now it became interesting. I connected my old tube TV which features an AV input with the AV output of the Banana Pi and pluged in the power. What shall I say? The screen stayed dark. One minute, two minutes, five minutes. The only “eye candy” were two LEDs. Basically a red LED which was constantly on and a green LED which first was on and then went into a slow blinking pattern. An SOS? No actually this is a good sign as it shows that the CPU and SD card talk to each other.
  • RED LED = power
  • GREEN LED = SD Card Access
But then I connected the Banana PI via it’s HDMI plug to the TV and it worked!

Logging in to the Banana PI

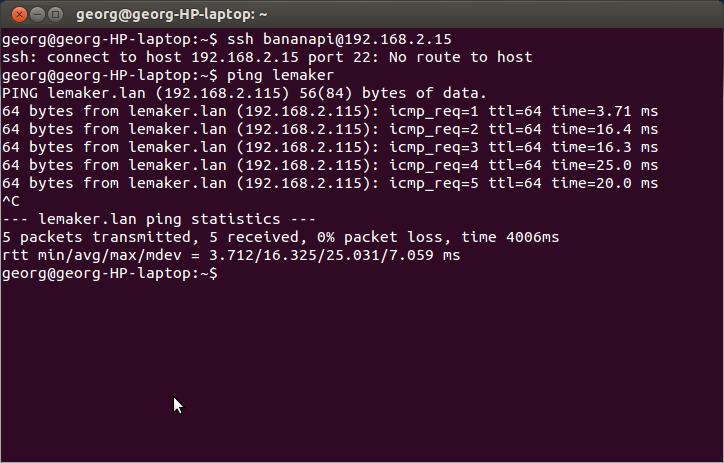
I wanted to use the machine remotely so I tried to log in from a console via ssh. For this to succeed you need to know the IP address that the Banana PI got assigned via DHCP.
1
ping lemaker
1_ping_lemaker
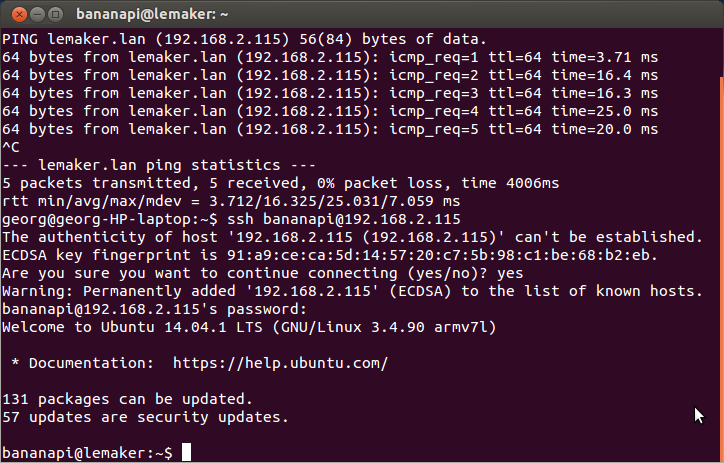
In your case the IP might be of course different but in mine the following command will alow you to log in as root.
1
ssh root@192.168.2.115
2_first_login
Congratulations your first log-in!
As you see there are quite some upgrades pending.
Therefor the next thing to try is to call
1
apt-get upgrade
Please note, as we just logged in using the root account this will work perfectly. If we however use for example the banapi user account where you would call
1
sudo apt-get upgrade
this will fail as the bananpi user account has no sudo permission. If you paid close attention you probably spotted that the console screenshot above shows a log-in with the bananpi user account. So I actually run into that problem and I will show you some chapters below how to get rid of this limitation.

A second SD card does not work

While using mainly ssh and no monitor. I realized that I am in for an OS change. An OS such as Bananaian without X support might fit better. Besides I find it a realy cool feature to just swap SD cards to fire up another OS and bought an SD card in a shop. Also 8GB, same vendor but this card was just Class 4 and not Class 10 as my initial card.
  • SanDisk SDHC Card 8GB class 4
I repeated the steps I made for the first SD card. This time with no success, it did not work. I had permanently the green LED on, which as I know today, is no good sign. In this case the device is not booting up and is not getting an IP address.
After hours of casting “format” commands and “dd” commands in different variations at the SD cards I felt frustrated and had to accept failure. The card itself is perfectly working in my laptop but it is not tolerated by the Banana Pi.

Trying a third card identical to the first

I wanted to have a second working card and just bought the same class 10 card and of cours it worked! So why does the class 4 not work…? If anyone knows please drop a comment.

Power consumption

As I mentioned, power consumption is a key parameter for me. So I tried to measure the power consumption with the meter that I have used in the past. Well what shall I say, the meter that is working happily on a TV, laptop or radio is not accurate enough to measure the Banana Pi. The Banana Pi does just not consume enough power and my meter does not bother and keeps displaying a 0 consumption.

Do you need a case for the Banana Pi?

If you studied carefully my list of ingredients at the top of the article you may have noted that I did not buy a case. I thought I could save the money but the handling of the naked board is cumbersome if it sits loosly in front of you on your table. So I would suggest that if you can spare the money go an buy a case. I will do the same.

Configuration changes I would recommend

DO NOT STAY WITH THE DEFAULT PASSWORDS

The OS just installed has a password that is known to everyone. Even worse the password of root on that machine is known to everyone, which is dagerous. That should send cold shivers down your spine. So we better go and change it now!
It is no good idea to keep the passwords unchanged!
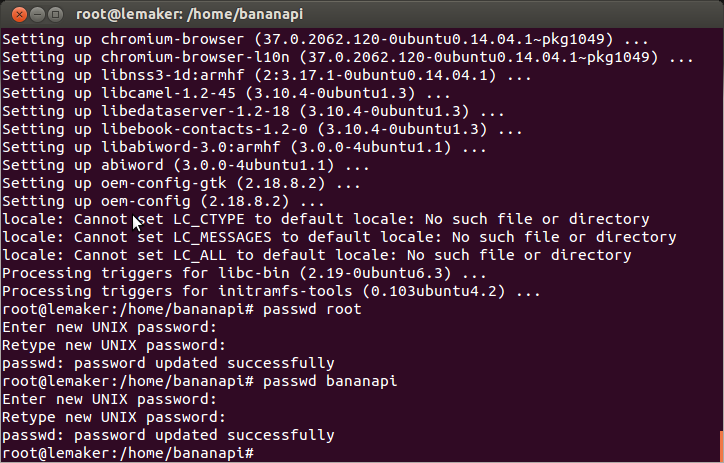
Just enter the below commands and type and re-type your new cunning password as requested.
1
2
passwd root
passwd bananapi

ASSIGN SUDO RIGHTS TO USER BANANAPI

I do not like working as root so to grant to the user bananapi the rights you have to add him to the sudo group as by default it belongs just to the below groups
1
id bananapi
We add the user bananapi to the group sudo
1
2
usermod -a -G sudo bananapi
id bananapi
uid=1000(bananapi) gid=1000(bananapi) groups=1000(bananapi),4(adm),20(dialout),21(fax),24(cdrom),25(floppy),26(tape),27(sudo),29(audio),30(dip),44(video),46(plugdev),102(netdev),105(fuse),108(scanner),113(lpadmin)
6_changing_passwords
Good-Bye Root! Now we can exit back to the bananapi account and work with the new sudo rights.
There is one catch, the systm did not reread the groups. The easiest way of getting a reset of the group ids is by exiting the ssh and reopen the ssh connection.

INFLATING A 4GB IMAGE IN AN 8GB SSD LEAVES SPACE

The OS image is apparantly from a 4GB card and I have used a 8GB card which leaves 4GB ununsed as you can see if entering the commadn fdisk -l when being logged in to the Banana PI. In the below you have to look at the used sectors and divide this by 2 to get to the size in kBytes.
1
sudo fdisk -l
Disk /dev/mmcblk0: 7948 MB, 7948206080 bytes
4 heads, 16 sectors/track, 242560 cylinders, total 15523840 sectors
Units = sectors of 1 * 512 = 512 bytes
Sector size (logical/physical): 512 bytes / 512 bytes
I/O size (minimum/optimal): 512 bytes / 512 bytes
Disk identifier: 0x2b1c25d6
Device Boot      Start         End      Blocks   Id  System
/dev/mmcblk0p1            2048      124927       61440   83  Linux
/dev/mmcblk0p2          124928     7167999     3521536   83  Linux