Thursday 22 October 2015

PROGRAMMING AND UPLOADING ARDUINO SKETCH WITHOUT IDE

Arduino-mk package makes it simple to build and upload sketches on a Raspberry Pi without the bloated Arduino IDE.
Install the package:

sudo apt-get install arduino-mk
This will install all the required software and files.
Create a library area in your user home directory with a demo sketch in it:
mkdir ~/sketchbook
cd ~/sketchbook
ln -s /usr/share/arduino/Arduino.mk
mkdir blink
cd blink
sudo nano blink.ino

// Blink

void setup(void) {
  pinMode(13, OUTPUT);
}

void loop() {
  digitalWrite(13, LOW);
  delay(1000);
  digitalWrite(13, HIGH);
  delay(1000);
}
Save it.
Create the Makefile:
sudo nano Makefile
# board tag is very import put your board name and model no
BOARD_TAG = mega2560 
ARDUINO_PORT = /dev/ttyACM0
ARDUINO_DIR = /usr/share/arduino
include /usr/share/arduino/Arduino.mk
make
make upload
It will prepare the c and bit files and burn the memory on your Arduino. Watch your LED blinks.
Other commands to perform various tasks:
make – no upload
make upload – compile and upload
make clean – remove all our dependencies
make depends – update dependencies
make reset – reset the Arduino by tickling DTR on the serial port
make raw_upload – upload without first resetting
make show_boards – list all the boards defined in boards.txt (11431)

How to write program for arduino

1. Frist install arduino into your machine. After installation done open arduino IDE.

2. Create new file in arduino IDE. Let's we make blink program into arduino.

    // Blink program for arduino microcontroller

void setup(void) {
  pinMode(13, OUTPUT);
}

void loop() {
  digitalWrite(13, LOW);
  delay(1000);
  digitalWrite(13, HIGH);
  delay(1000);
}


3. Save file and connect your arduino micro controller with machine.

4. Select board Tools > Board > Select Arduino board

5. Upload program check IDE bottom it will show your program upload successfully or error in your program.

6. After complete it check your arduino board.

Friday 16 October 2015

how to check running application status into linux

Open your terminal and type following command:

example:- ps aux | grep node


How to run application on startup in raspbianpi

1. Setp first open your raspbianpi terminal and type sudo nano /etc/rc.local.

2. put your application loaction and put your start file location.

for example: let me start node server when system start

/usr/local/bin/node /home/bananapi/Descktop/demoApp/app.js


How to run application on startup in ubuntu

1. Step first create xyz.conf file into /etc/init/ and put your script.

example : let me start node server on start up

description "test job"

start on runlevel [2345]

exec node /path/of/your/file/script.js

2. Save this file.

3. now type command sudo service xyz start. Node server will start.

You can stop it with stop command and restart with restart command.

Thursday 15 October 2015

Problem: apt-get-repository Command is Missing


I was trying to install the latest version of git from the Ubuntu Git Maintainers Team and I needed to add a Personal Package Archive (PPA) to the Software Sources. But when I tried to do this, I got an error:
?
sudo: add-apt-repository: command not found

Solution: Install the software-properties-common Package

To get the add-apt-repository command, install the software-properties-common package. For my Ubuntu version (precise), I also had to install the python-software-properties package:
?
$ sudo apt-get install software-properties-common python-software-properties
Then then you add the PPA, update your sources, and upgrade your the package. In may case, I wanted to upgrade git, so I did the following:
?
$ sudo add-apt-repository ppa:git-core/ppa
$ sudo apt-get update
$ sudo apt-get install git
And boom — I was all set.

Wednesday 14 October 2015

Setting Up a Static IP Address for the Raspberry Pi

Boot into Raspian and log in (Username. pi, Password. raspberry), this will all be command line stuff, so no need to log in to the GUI if X isn’t started automatically.
Have a pen and paper at the ready! . . . 
First, we need to list the network interface we currently have available:
cat /etc/network/interfaces
Static IP 01
The line . . . . 
iface eth0 inet dhcp
Implies that we’re currently getting the IP address via DHCP, meaning it’s being dynamically registered by the router. This is what we need to change!

Gathering Network Information:

Fist of all we need to retrieve some information from our router and the Raspberry Pi. First we need to run the following command to retrieve the first part of the information.
ifconfig
StaticIP-02
This reveals your router information, the bit you want is after eth0 (the ethernet connection). . . .
eth0      Link encap:Ethernet  HWaddr b8:27:eb:cc:03:0e
               inet addr:10.0.0.111  Bcast:10.0.0.255  Mask:255.255.255.0
Write down the following information. . .
  • inet addr – 10.0.0.111 (Pi’s Current IP Address)
  • Bcast –  10.0.0.255 (The Broadcast IP Range)
  • Mask –  255.255.255.0 (Subnet Mask Address)
We need a little more information before we proceed, so run the following command.
netstat -nr
Static IP 03
We need:
  • ‘Gateway’ Address – 10.0.0.138
  • ‘Destination’ Address – 10.0.0.0

Editing Network Configuration:

We now need to plug this information into the Raspberry Pi’s network configuration file using a text editor. For this use the nano text editor as follows. . .
sudo nano /etc/network/interfaces
Static IP 04
Simply change the line that reads:
iface eth0 inet dhcp
to
iface eth0 inet static
Then directly below this line enter the following (Please Note. You will need your own addresses we gathered in Part B, more details below). . . . 
address 10.0.0.11
netmask 255.255.255.0
network 10.0.0.0
broadcast 10.0.0.255
10.0.0.138
To clarify what each part means. . . . 
address – The address you want to give your Pi, this can be any IP in the network range, but it’s usually advisable to go higher rather than lower, or you could end up logging different devices to the same IP! I’ve selected 10.0.0.11, as address (denoted by ‘inet addr‘), but this can be any IP address from the range10.0.0.1 to 10.0.0.255.
netmask – The ‘Mask‘ address we wrote down earlier.
network – The router IP address, this is the ‘Destination‘ Address was found earlier. You can also grab this off your router, it will say on the side somewhere.
broadcast – The ‘Bcast‘ address we wrote down earlier. 
gateway – This is the ‘Gateway‘ address we found earlier.
Static IP 05
So, it should look something like the above, but with your values!
Note that in the above example I also set the Wi-Fi IP to the same as the Ethernet for simplicity as this Raspberry Pi runs my BrickPi Interface Board normally.
Remember to save before exit, CTRL+X (exit) then yes to save changes!

Check the New Static IP Configuration:

We will now need to reboot the Raspberry Pi for the changes to take effect. 
sudo reboot
Log back into the Raspberry Pi and run 
ifconfig
Your new Network Setting be should revealed.
Static IP 06
To double checks all is working as it should, ping your ‘Gateway‘ Address. . . 
ping 10.0.0.11 -c 10
(the -c 10 command simply denotes that you want to ping it 10 times, if you forget to add this, it will ping the address continuously. To stop it press CTRL+C)
Static IP 07

How to Setup an LCD Touchscreen on the Raspberry Pi

In this tutorial, I will walk you through the process of installing an LCD touchscreen on the Raspberry Pi, step by step. Many LCD touchscreens for the Raspberry Pi include an image file that you can write to your SD card and get up and running pretty quickly. But what if you want to run a clean version of Raspbian, without all the bloatware included on the manufacturer’s image? Also, what if you want to install a different OS such as Rasbmc or XBMC? In these cases, you should follow this tutorial and go through the steps to configure it on your own. This works on the Raspberry Pi 2 Model B as well as older versions of the Raspberry Pi. Don’t worry, it’s not that hard!
I am using the Waveshare 3.2″ TFT (thin-film transistor) LCD. Many other LCD screens are supported by this process, but check here to see if your screen is supported by the FBTFT driver to make sure. Scroll down the file and look for an abbreviated name of the screen you are using:
FBTFT Supported Screens
What we need to do to get the LCD working is install and configure the FBTFT drivers created by notro. There are two types of drivers we need to be concerned with here. One set of drivers is for the actual LCD display screen, and the other set of drivers is for the touchscreen sensors. Here is a good article explaining Linux kernel modules, devices, and drivers, which you may want to read for some background information. The standard version of Raspbian does not include the drivers for LCD touchscreens, so we will need to install and configure them manually. So just follow the steps below to get your LCD touch screen working on the Raspberry Pi.
Watch the video tutorial for a quick overview of the steps:
Touchscreen Setup and Configuration
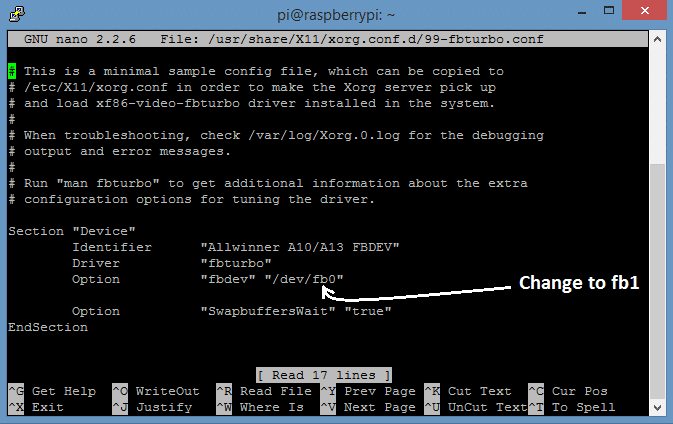
1. First we need to configure the fbturbo video driver to output the display of the Raspberry Pi to the SPI bus instead of the HDMI bus. At the command prompt, enter: sudo nano /usr/share/X11/xorg.conf.d/99-fbturbo.conf
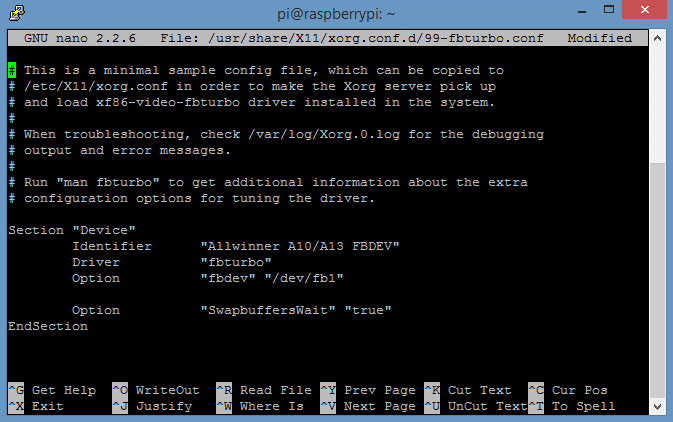
In this file, find the line that says: Option “fbdev” “/dev/fb0″ and change the fb0 to fb1:
LCD 99-fbturbo step 1
The fb0 option tells the video driver to output to HDMI, and the fb1 option tells it to output to the LCD screen. The file should now look like this:
lcd 99-fbturbo step 2
Press Ctrl-X then Y to exit nano and save the changes. 
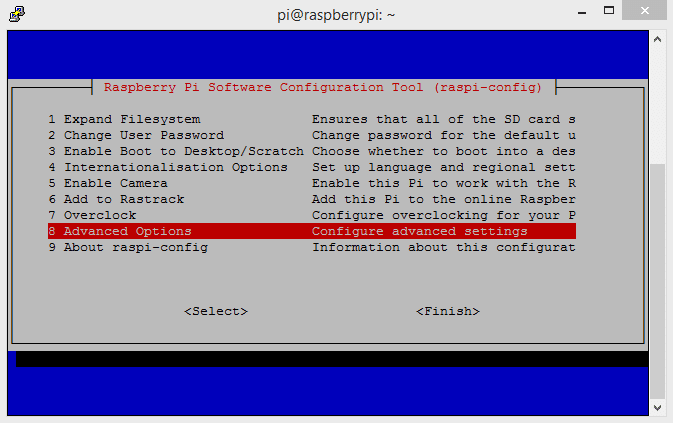
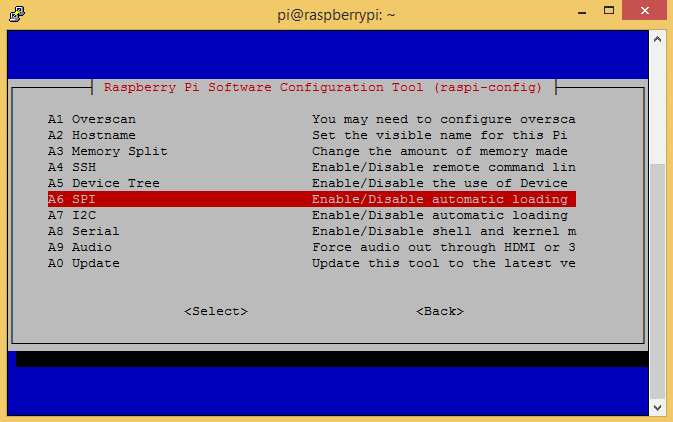
2. The touchscreen uses SPI (serial peripheral interface) to communicate to the main processor. By default, SPI communication is disabled. If you are using the Raspberry Pi 2 Model B, or a version of Raspbian released after 1-31-2015, this can be done in the raspi-config menu. Enter sudo raspi-config at the command prompt to enter the configuration menu, then find the “Advanced Options” line:
Raspi-config advanced settings

Click enter here to see the Advanced Options, then find the line that says “SPI    ENABLE/DISABLE AUTOMATIC LOADING“:
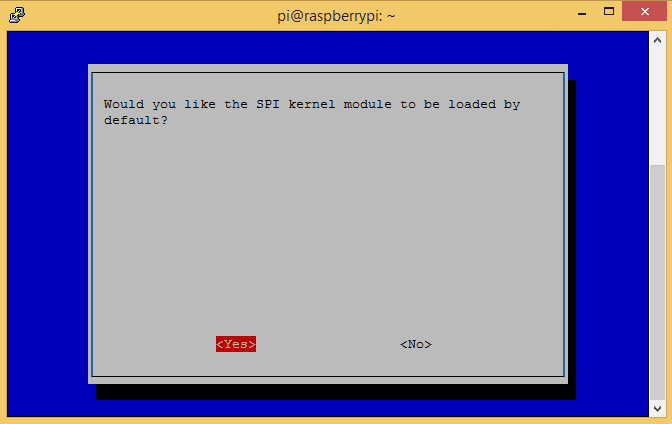
Raspi-config enable spi
Click enter here:
Enable SPI
Then enter again for “yes”. Now exit the configuration menu and enter sudo reboot at the command prompt. You can skip to step 3 now.
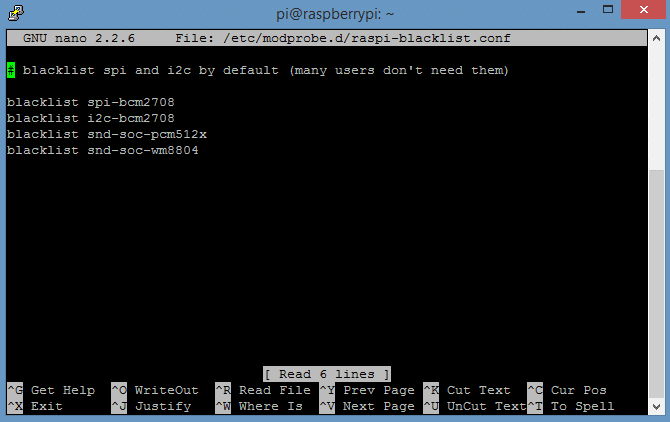
If you are using a version of Raspbian that was released before 1-31-2015, we need to enable SPI it by removing the entry from the blacklist file. Enter sudo nano /etc/modprobe.d/raspi-blacklist.conf at the command prompt to edit the file:
lcd spi blacklist before #
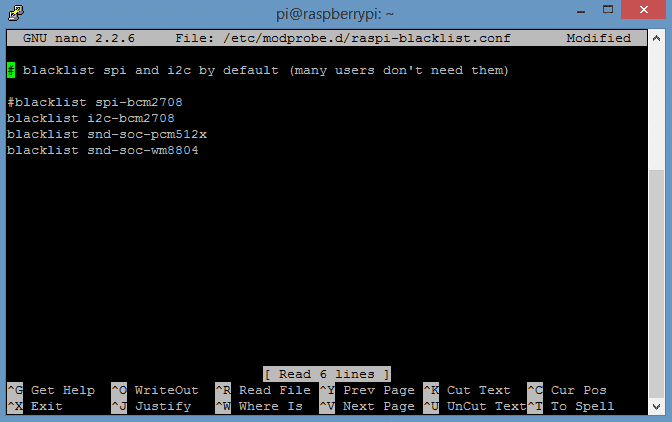
We need to remove the spi-bcm2708 driver from the blacklist by “commenting out” the line that says:blacklist spi-bcm2708. Placing a “#” in front of the line tells the computer to ignore it:
lcd spi blacklist after #
Press Ctrl-X then Y to exit nano and save the changes. 
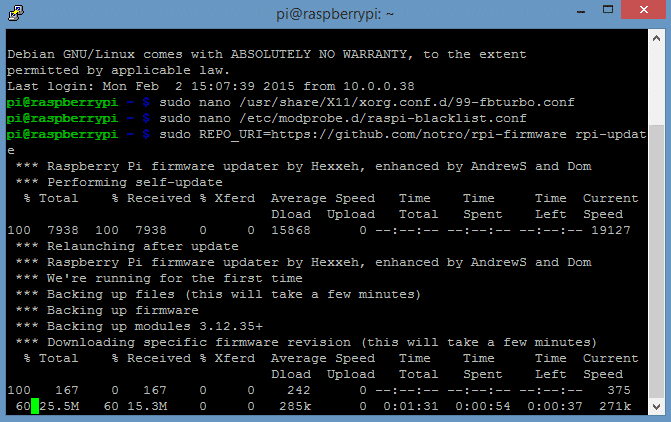
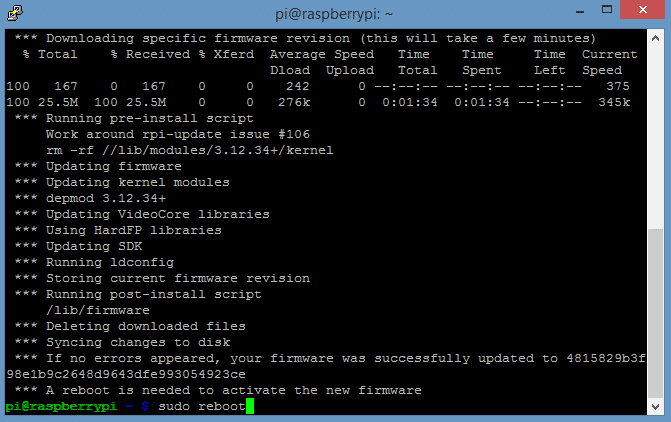
3. Now we can download and install the drivers for the LCD. At the command prompt, enter sudo REPO_URI=https://github.com/notro/rpi-firmware rpi-update. This will download and install the drivers and kernel modules that are needed to run the LCD touchscreen. The download is about 47.2 MB:
lcd drivers install
After the drivers have downloaded and installed, a reboot is necessary, so enter sudo reboot or sudo poweroff:
lcd drivers install then reboot
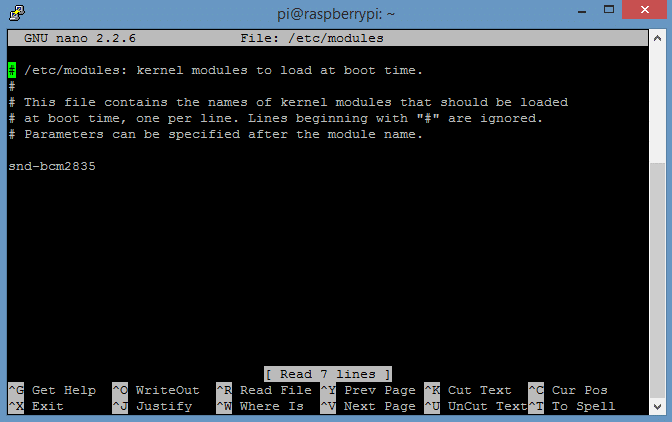
4. After booting up and logging back in to the Raspberry Pi, we will need to configure the kernel modules for the LCD and the touchscreen. To configure these kernel modules, we need to edit the /etc/modules file. At the command prompt, enter sudo nano /etc/modules:
lcd etc.modules before edit
The first term of each line in this file is the name of a kernel module that will be loaded automatically at boot time. The terms after the name of the kernel module on each line are called parameters, and parameters can be changed to adjust the properties of each kernel module.
Currently, the only module that is set to load automatically is snd-bcm2835, which is the module for the Raspberry Pi’s Broadcom processor.
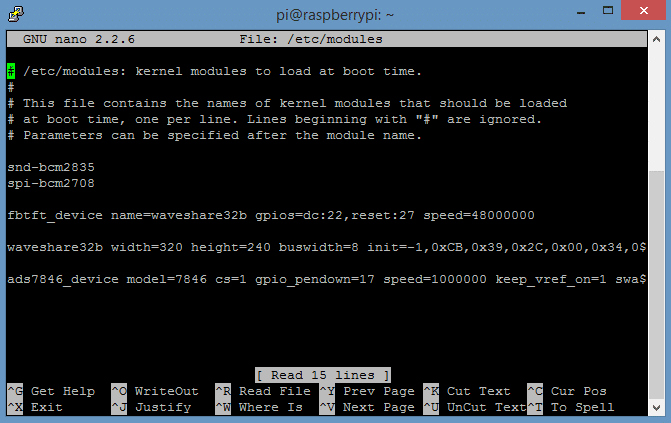
Add this code below the snd-bcm2835 line to support the fbtft_device and ads7846_device modules:
2
3
4
5
6
7
8
fbtft_device name=waveshare32b gpios=dc:22,reset:27 speed=48000000
waveshare32b width=320 height=240 buswidth=8 init=-1,0xCB,0x39,0x2C,0x00,0x34,0x02,-1,0xCF,0x00,0XC1,0X30,-1,0xE8,0x85,0x00,0x78,-1,0xEA,0x00,0x00,-1,0xED,0x64,0x03,0X12,0X81,-1,0xF7,0x20,-1,0xC0,0x23,-1,0xC1,0x10,-1,0xC5,0x3e,0x28,-1,0xC7,0x86,-1,0x36,0x28,-1,0x3A,0x55,-1,0xB1,0x00,0x18,-1,0xB6,0x08,0x82,0x27,-1,0xF2,0x00,-1,0x26,0x01,-1,0xE0,0x0F,0x31,0x2B,0x0C,0x0E,0x08,0x4E,0xF1,0x37,0x07,0x10,0x03,0x0E,0x09,0x00,-1,0XE1,0x00,0x0E,0x14,0x03,0x11,0x07,0x31,0xC1,0x48,0x08,0x0F,0x0C,0x31,0x36,0x0F,-1,0x11,-2,120,-1,0x29,-1,0x2c,-3
ads7846_device model=7846 cs=1 gpio_pendown=17 speed=1000000 keep_vref_on=1 swap_xy=0 pressure_max=255 x_plate_ohms=60 x_min=200 x_max=3900 y_min=200 y_max=3900
Note: Line 6 is long so make sure you get everything, and use cut/paste to avoid typos. The file should look something like this now:
lcd etc.modules after edit
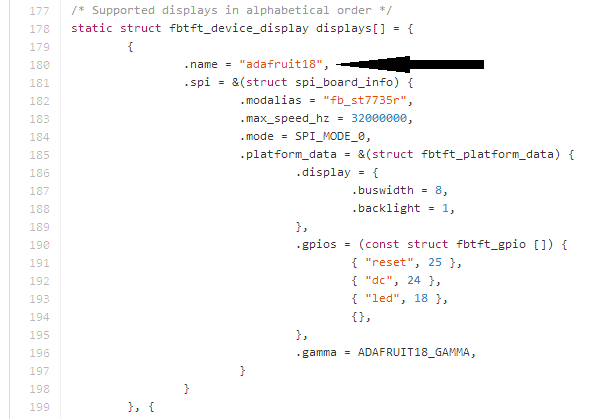
The kernel module for the LCD screen is called fbtft_device and the kernel module for the touchscreen is called ads7846_device. ads7846 is the name of the touchscreen controller chip used in the Waveshare 3.2″ LCD and many other touchscreen displays.
If you are not using the Waveshare 3.2″ Touchscreen LCD, first find the fbtft_device name of your device by checking here. Next, on the line that begins with fbtft_device, change the termname=waveshare32b to name=YOUR DEVICE NAME. Now, on the next line that begins with waveshare32b, change the waveshare32b term to your own device name, for example adafruit28, or sainsmart32_spi
Press Ctrl-X then Y to exit nano and save the changes. 
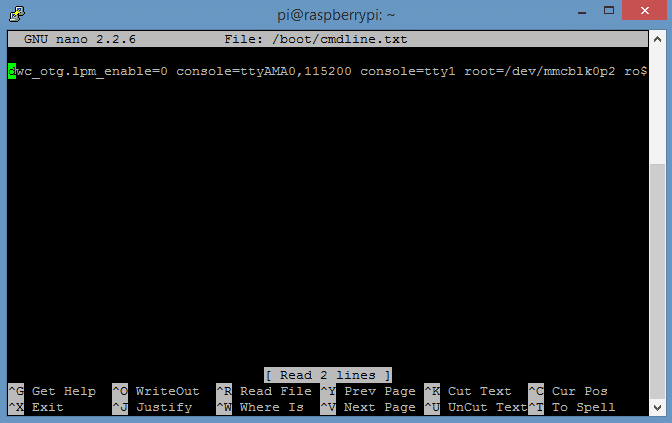
5. Now we need to edit the /boot/cmdline.txt file which contains all of the settings used to configure the system when it boots up. This file is read by the GPU (graphics processing unit), before it is read by the CPU (central processing unit) and the Linux OS. It is equivalent to BIOS in other systems, and contains lots of useful optionsfor configuring your system at boot time. To edit this file, enter sudo nano /boot/cmdline.txt at the command prompt.
lcd boot.cmdline.txt before and after edit
Replace the code in this file with this code, entered in one single line:
1
2
dwc_otg.lpm_enable=0 console=ttyAMA0,115200 console=tty1 root=/dev/mmcblk0p2 rootfstype=ext4 elevator=deadline rootwait fbtft_device.custom fbtft_device.name=waveshare32b fbtft_device.gpios=dc:22,reset:27 fbtft_device.bgr=1 fbtft_device.speed=48000000 fbcon=map:10 fbcon=font:ProFont6x11 logo.nologo dma.dmachans=0x7f35 console=tty1 consoleblank=0 fbtft_device.fps=50 fbtft_device.rotate=0
Note: This line is really long, so make sure you get everything, and copy/paste to avoid typos.
Similarly to what was done in step 4 above, if you are not using the Waveshare 3.2″ Touchscreen LCD, first find the fbtft_device name of your device by checking here. Then replacefbtft_device.name=waveshare32b in the code above with fbtft_device.name=YOUR DEVICE NAME. 
Press Ctrl-X then Y to exit nano and save the changes. 
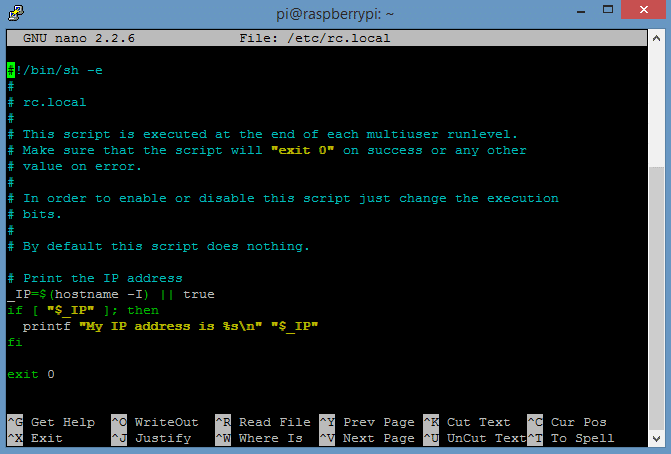
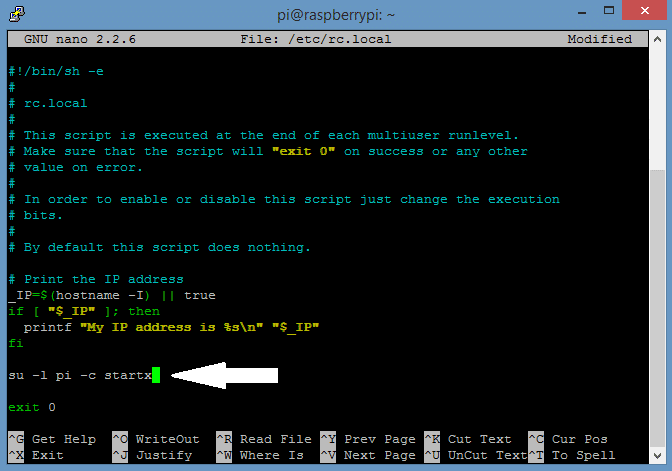
6. The final step is to setup the Pi to load startx automatically and boot to the GUI. If you would rather boot to the command prompt, just skip this step. Enter sudo nano /etc/rc.local at the command prompt:
lcd .etc.rc.local before edit
Now add su -l pi -c startx above the line that says exit 0:
lcd .etc.rc.local after edit
Press Ctrl-X then Y to exit nano and save the changes. 
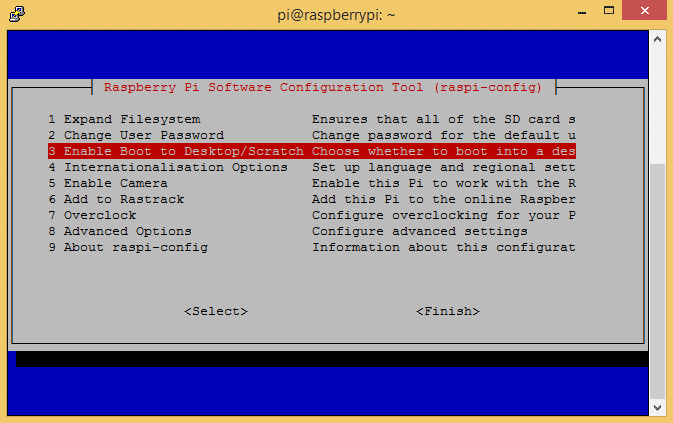
If you are using the Raspberry Pi 2 Model B, the next step is to set the system to boot to the desktop GUI in the raspi-config menu. If you are using versions of Raspbian earlier than 1-31-15 on the Model B+, you can skip this part.
At the command prompt, enter sudo raspi-config.
raspi-config boot to desktop
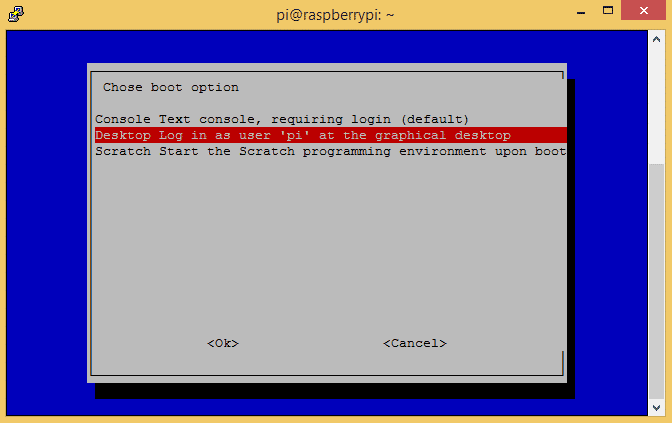
Select the line that says Enable Boot to Desktop/Scratchand press enter.
raspi-config boot to desktop 2
Select the line that says Desktop Log in as user “pi” at the graphical desktop, and press enter.Now exit the raspi-config menu.
At the command prompt, enter sudo reboot, and after the Pi boots up the GUI should appear on the LCD screen:
IMG_7660
If your screen looks like this:
IMG_7656
It is probably due to your Pi being overclocked at turbo speed or Pi2 speed. Try the high setting or lower to fix this. 
There have been some issues with the FBTFT drivers when using sudo update and sudo upgrade. Some people have reported that after updating and upgrading, the LCD touchscreen stops working. This seems to be caused by the Raspberry Pi bootloader package overwriting the FBTFT kernel and modules during the update/upgrade install. To prevent this from happening, update and upgrade by:
1. Updating all packages except for the Raspberry Pi bootloader by entering this at the command prompt:
1
2
3
4
sudo apt-mark hold raspberrypi-bootloader
sudo apt-get update
sudo apt-get upgrade
2. Then, updating the Raspberry Pi bootloader independently by entering this at the command prompt:
1
2
3
sudo apt-get install rpi-update
sudo SKIP_KERNEL=1 rpi-update
If your drivers have been accidentally overwritten, they can be restored without having to go through the entire installation process again. Just enter this at the command prompt: 
1
2
3
sudo REPO_URI=https://github.com/notro/rpi-firmware BRANCH=builtin rpi-update
sudo reboot
More information about this issue can be found here.
Continue on to the next article Raspberry Pi Touchscreen Calibration and Screen Rotation to find out how to change the screen orientation of your Raspberry Pi and calibrate the touchscreen for the best accuracy.
If you have had any problems setting up your Raspberry Pi LCD touchscreen, please leave a comment below and I will try to help you solve it…
Also, please don’t forget to share this article to other Raspberry Pi fans if you found it useful!